Friday 30 December 2011

The Stamp Man 3rd Annual Favorite crafting project awards


Its Time for the 3rd annual Stamp Man Annual Awards challenge and we'd love you to join us this year by proudly presenting your best/favorite project that you feel you have made during the year.

It doesn't have to be something you entered for our challenges, Just as long as it was something you enjoyed making and would like to share. The most important part of this challenge is to have fun and enjoy taking time to look back on your crafting over the last year.


My favorite project of 2011 was from the Dragonflies and Butterflies challenge. You can view my original post here. I loved making the vellum butterflies and the cage from recycled plastic packaging and one of my favorite stamps the mesh from the Christmas set Aspects of Design. The butterflies and dragon flies are also another well used set in my collection. On gossamer wings.

Now if you pop on over to The Stamp Man Challenge blog you can see all the other DT favs from the year and then show us yours.

There will be a random prize draw for the top prize which will be

£30 of Stamp Man Gift Vouchers, and 4 runner up prizes!

For a chance to win a prize you must:

- Display The Stamp Man award blinkie in your sidebar
- Link to a post about our annual awards. Within the post you should then either show your project again or you can place a link to your original project whichever you wish to do.
- Use Inlinkz on The original Stamp Man post to link to your post.

We have really enjoyed viewing all your wonderful work throughout 2011 and hope you will join us again in 2012. Thanks for popping in and have a wonderful New Year!
Angela

Tuesday 20 December 2011

Try it on Tuesday new Challenge

The theme this week over at Try it on Tuesday is "Anything goes" So I decide to do this layout. I had to use all the items in a kit as a challenge so here is the outcome. The pics are from Belle when she decided to take a box of Packing peanuts and make snow angels. Unfortunately they are not easy to vacume up and all had to be picked up by hand because of the static. Yuk. What a mess. But at least she had fun.

Now head on over to the TIOT blog for some more brilliant inspirations and a peak at our very talented Guest designer Kelly.

Thanks for stopping in and have a wonderful day. Angela

Friday 16 December 2011

New Stamp Man Challenge


The new challenge is up at The Stamp Man and this time we want to see you use a technique you have never used before. This one had me racking my brain as I normally have to try something the minute I see it. I scoured my Craft Stamper mags to see what I could find and I remembered seeing a salt technique so that is where I started although the embossing bit went a bit all too wrong. After several days of playing I finally settled on this card. I will have to say it is not going to be a favorite technique for sure but I got to give it a go. The technique originally used Salt with embossing but my results time after time for that were very daunting so I switched it around a bit and used the salt with inks instead(think I saw that one in Craft Stamper too). It had a nice effect although very hard to see in a photo. The snowman is stamped and cut and wording is stamped on the background using white Stazon.
Now there is more inspiration on The Stamp Man Challenge blog then we would love to see your projects. Don't forget to tell us what technique you used in your post.
Thanks for stopping by and have a wonderful day!
Angela


My Materials list:
White Stazon ink
Salt
Border Ribbon (the Stamp Man Shop)

Wednesday 14 December 2011

I'm late....

I know I am very late this week for the TIOT challenge. After a bit of and accident monday it has taken me a few days to catch up. So Sorry.

This week the challenge at TIOT is "Gift Tags Galore" so we want to see all your wonderful gift tags. For mine I made them using various Dylusions sprays and paints along with Distress inks, Tim Holtz Stamps and Hero Arts Owl stamp. The owls are colored with Promarkers and the tag is edged with Distress stickles.
Now its your turn to hop on over to the TIOT blog and show us your tags. There is lots more brilliant inspiration from the rest of the team so be sure to check it out.

We have been having a few problems with the post and Mr Linky over at the TIOT blog so please bear with us during our technical difficulties. Thank you!

Now I also have to apologize for being MIA for so long. Aside from my little accident I have been working hard at home trying to finish the unpacking so that we could get things in order and get the Christmas decorations up. Here is a pic of my little village. Unfortunately 2+ years in the attic has caused alot of the little pieces to get broken but most were easily fixed.
And here is the tree. It seems as though we have enough stuff to decorate about 5 trees. Don;t know how that happened.
And here is something I just have to share. Our Foster girl Lexie a 6 year old Rottie has an interesting hobby. She loves the TV. She will literally sit for hours watching the telly and yes she actually is watching it. Too funny. She even has her favorites.......
Now Sun on the other hand could care less about the telly. Just give her a blanket and cozy place to curl up and she is good.
Guess she is worn out from all the decorating.

Now don't forget to check out the new challenge over at TIOT. It's tag too so it fits right in with the holidays.
Thanks for stopping in and have a lovely day. Angela

Tuesday 13 December 2011

Tuesday 6 December 2011

Time for another Challenge at Try it on Tuesday and this week we are celebrating the big guy so we want to see all your cards with him. We are once again sponsored by our good friends at One Stop Card Crafts this week so one lucky winner will get a voucher to use in their online shop.

For my card I used my Stampin up tree and Santa. they are colored using Promarkers and touched up with some Spica glitter pens and sticky gems. The background started as some white card. I inked it up with old paper and walnut Distress inks then stamped it using Tim Holtz Christmas Carol stamp and some old canvas for the texture. The red card is inked with Fired brick Distress ink and stamped in Walnut with the same stamp. The button is from BoBunny and the ribbon from my stash. I have to say I did not think the images would take as long as they did to color. There were so many intricate bits to color. Sorry about the lighting on the card it is a bit washed out because of the flash. I so miss our house in England with all the natural light. So much better for photos.

Now you can see some more great inspirations from my team mates at the Try it on Tuesday blog. You can also upload your card for us to see. We cannot wait to view them.

Thanks for stopping in and have a wonderful day. Angela

SDC43 card

The challenge over at the Stampotique Designers challenge Blog is to create a non traditional Christmas card without using red and green. It is also a Stampotique only week so you can only use there stamps. I do not have any Christmas related stamps from them so I chose to go with "The Crafter" The background is done with blues, purples and pinks of Dylusions spray inks and stencils with water. I then added some trim using Dylusions paints. The Crafter is stamped and embossed in clear then some glitter added. Her hat is made from stamping her shoe then cutting it out. the flowers are Stampotique too. The wreath is made from free handed cutout hearts. The sentiment is also hand doodled. The colors show more vibrant in person but are getting washed out with my flash, so sorry. I might have to try and get a pic outside tomorrow if we get some nice light.

I am entering this into the SDC43 challenge.

Thanks for stopping in and have a wonderful day. Angela

Friday 2 December 2011


Wow! I cannot believe it is December already. Time is flying by the quicker we get to Christmas and the end of the year.

Well its time for another challenge over at The Stamp Man and the theme this fortnight is "Ornaments" chosen by Jill. It can be an altered item made into an ornament, table decoration or even an ornament shaped card, and it doesn't have to be Christmas themed. Just dig out those festive supplies and have some fun!

For my project I chose to make some paper ornaments using Nestabilities dies from Spellbinders. These are really easy to create. Just cut 3 of the larger Nestie shape and fold each in half adhere one back side of each to another then adhere the final 2 side. the inside is a smaller Nestie die decorated and adhered by the sides inside each larger Nestie. the beads are on pins and held in place with a drop of glue. My complete materials list may be found below.

Now hop of over and see the rest of the fab projects created by my team mates at The Stamp Man then we would like to see yours.

Thanks for stopping by and have a great day.


My Materials List:

Tuesday 29 November 2011

what to do with a bean tin?

What to do with a tin bean can? Well the challenge over at The Try it on Tuesday blog is to alter a Tin. At first the challenge was to alter a Bean tin but then it was decided to alter any kind of tin. Of course I had already started my Bean tin so here it is...

I had a few different ideas but after the dog broke my nose Monday morning when i picked her up from the kennel after returning from Holiday(No it was not really her fault, she jumped as I leaned over to check on her), I decided to keep it simple. Thankfully my nose is not too bad although sneezing is out of the question. Anyway, for my tin I decided to use my Hero Arts tree stamp I just received from The Stamp Man along with the fairy stamp which is also from The Stamp Man last summer. The leaves are from a Tim Holtz stamp set. I lined the top of the tin with a fuzzy fiber.

Now this week we are generously being sponsored by The Craft Barn once again Who have a £15 voucher for one lucky entry. All you have to do is to have a go at altering a tin then link it up on the Try it on Tuesday blog. There is lots of fab inspiration from the rest of the team just waiting to be checked out so do go have a visit.

Now I am off to rest my aching head. Thanks for stopping in and have a lovely day. Angela

Tuesday 22 November 2011

Shrink Plastic

The theme this week at The Try it on Tuesday challenge Blog is "Honey I shrunk the Plastic" or Shrink Plastic in more general terms. We would like to see you use some type of Shrink film in your project. For my project I used shrink plastic to create a pin that attaches to a gift card.
I die cut the shrink film using Tim Holtz Tattered Floral die then stamped using the music sheet from Tim's Christmas stamps. I then shrunk and colored the flowers using red Promarkers. The swirls are also cut from shrink film and heated into a shrunken shape. They are colored using gold ink and gold stickles. The pieces are then all glued together and adhered to the pin. The card is done using masking techniques with the scraps from my flower.

Now if you head on over to the TIOT blog you can get some more great inspirations for working with Shrink plastic from the Design team and our wonderful guest Designer Corry.

Wishing you a wonderful week and thank you very much for stopping by. Angela

Friday 18 November 2011

New Challenge at The Stamp Man

The new challenge at The Stamp Man this fortnight is all about Tim Holtz Tags of Christmas techniques. We want you to use one of Tims Tags of Christmas as inspiration for your own project. It does not have to be a tag as ling as it is inspired by one of Tim's. You can find a link to them on Tim's blog. or on The Stamp Man Challenge Blog.


For my inspiration I used Tims tag #11 from 2010 .

Now if you head on over to The Stamp Man Challenge blog you will find lots more wonderful inspiration from my team mates. Then its your turn to show us your project. Remember to include a link to the tag that inspired you. Once lucky winner will win a £10 voucher to The Stamp Man shop so Good luck and we cannot wait to check out your projects.

Thanks for stopping by and have a wonderful day. Angela

Wednesday 16 November 2011

Another layout from the weekend.

This is another Layout I did over the weekend. It is a jack of Mandy's(yes I really mean it this time, sorry the other was a jack of Julies) from Scrap jacked. I loved these funny pictures of Belle with her Halloween costume on the day of a party at school. Her friend Casey was not dressed as she did not go. I had told Belle I did not have time to make her the vampire costume so she would have to be something simple but then surprised her with it that evening after spending all day making it. She loved it but quickly abandoned the teeth.

Thanks for stopping in and have a wonderful day. Angela


Tuesday 15 November 2011

New Challenge up at Try it on Tuesday

The new challenge is up at Try it on Tuesday and the theme this week is "Wish you were here" which can be interpreted in a variety of ways as you will see from the Design team and our wonderful guest designer Nikki.

For my card I wanted to play around with some acetate frames I had from My Minds Eye years ago. I stamped my sentiment using a Stampotique stamp on the frame and layered it above the image of my Stampotique Angel . the clouds are done using bubble wrap dipped in Dylusions white paint. I also layered the wings on the Angel and glittered them although you cannot see that in the photos. I forgot how hard it was to photograph acetate.


Hope you enjoy it. Now its your turn to hop over to the Try it on Tuesday blog and show us your interpretation of the theme. We cannot wait to see them.

Thanks for stopping by and have a wonderful day. Angela

Monday 14 November 2011

After a crafty Saturday

This is one of the layouts I did this weekend at the girls get together. Once a month a bunch of us try to get together at a local store and craft away. I jacked a layout from Julie over at Scrap Jacked. Scrap Jacked is a great place to get inspirational ideas for your layouts by jacking one of their designers. This month they have added a bunch more designers so there are inspirations abound.
***oops, I mistakenly said originally that I jacked Mandy's layout but it was Julies. I got them mixed up. So Sorry***
I chose to use a pic of Sophia our first foster. She was adopted a few weeks ago.
Here she is with Sunflower. They got along great.
and shared everything. Sunflower just loved her.
even Sunflowers crate.

then we got a new foster Maddy but she only stayed a little while before moving to her new home.
Maddy and Sunflower hit it off right away too.
And now there is Lexie our 5 year old Rottie. She is our newest Foster and such a sweetie.

Well now I had better roll on and try and get a little blog hopping done. Thanks for stopping by and have a great day. Angela

Tuesday 8 November 2011

Nothing like waiting till last minute.

Like I did with this project for the Stampotique Designers Challenge. The theme this time was to alter a Poison Bottle so I decided to alter a little bottle with Fairy Wish dust in a little altered book.
Here is the cover. Hope you like it. I used Stampotique heart flowers and Angel stamps as well as bits from a sentiment stamp from Stampotique too.

Thanks for stopping in and have a lovely day. Angela

New challenge for Try it on Tuesday.

The new challenge is up on Try it on Tuesday and the theme this week is "Peel offs" you know those lacey type metallic stickers we all seems to have bought at one time or another. We want to see your tags using Peel Off stickers. For my tag I used Christmas Peel off stickers as masks then layered them on recycled plastic and colored the backs with Alcohol inks for the dangling ornaments. The branches are stamped using Tim Holtz Winter Sketchbook stamp set and the inks are Tim Holtz Distress. The stars are also from the same Peel Off package.

Now hop on over to the Try it on Tuesday blog for some more wonderful inspiration by my team mates then show us your tags. Remember no cards this week as it is a tag only week. Thanks for stopping by and have a lovely day. Angela

Friday 4 November 2011

New challenge at the Stamp Man

Wow I cannot believe it has been another Fortnight already. I have been so busy with Belles Communion that the time has just flown.
The new challenge is up over at The Stamp Man and the theme is "Collage". What do we mean by "collage" you ask? Well it is a mix of images and possible mediums to create a semi cohesive background. For my project I created a card using the USARTQUEST Napkin collage kit. I have layered several images on the background using the napkins to layer them within the embossing and inking. I have also created a tutorial for this project so you can click here to see it.

Now we would like to see your "Collage" creation. Remember the winner gets a great Gift certificate to use at The Stamp Man shop. Now if you head over to The Stamp Man challenge blog you can see all the other wonderful inspirational pieces created by the team and share yours with us using the link tool. We cannot wait to see them.

Thanks for stopping in and have a great day. Angela

Napkin Collage tutorial


US Artquest Napkin Collage Tutorial
This is the wonderful set of goodies you get inside the USARTQUEST Napkin Collage kit. There are ATC cards, Glitter, Adhesive, Brushes, Sponge and cup as well as a selection of vividly colored beautiful napkins. The napkins will vary per kit but all are wonderfully designed and selected. Now what to do with all these goodies you ask? Well stick around and I will show you a little tutorial on using the kit to its full advantage.

I am going to create a winter card using the supplies in the kit as well as incorporating some Tim Holtz Stamps, Inks and a few other things.

First I start by preparing my card background. For this I used the mesh stamp from the Aspects of Design Christmas I set. I stamped the image and heat embossed using Detail Gold Embossing Powder.
Next I added Some color using Tim Holtz Distress inks and cut n dry foam.
Now onto the napkins. This one was in the first kit I bought. I love the bright birds on them. I cut out the birds to use in my card.
The backs of the napkins provide wonderful blank slates for adding your own images such as stamping or lettering. I removed the back here by peeling it carefully away.
To stamp on it use a quick set ink such as Stazon and stamp your image directly to the napkin. Do not leave it there too long as it will cause the ink to bleed. Just stamp and remove quickly. Here I used Tim Holtz Winter Sketchbook stamp set.
I also stamped some more using Tim Holtz Holiday Wishes stamp set.
Next to prepare the images to add to the card I tear them out of the napkin. You can cut of tear them as each will give a different effect. Cutting will leave a edge around the napkin once added into place whereas tearing will let the image blend in.
Now its time to start putting everything together. To adhere the napkins I will use the Perfect Paper Adhesive included in the kit. For my card I stamped some of the Pine image on to go under the bird. Once my ink was set I place my napkin image where desired and dip the sponge in the adhesive.
Press up and down on the image allowing the adhesive to soak through the napkin to the card. I did this throughout the card because I used a gloss adhesive and wanted the entire image to look cohesive. If you are just adhering the image you can use the paint brushes and add a bit of glue to the underside of the napkin then place down and carefully paint the adhesive on top of the image. If doing this be careful as the image is vary easy to tear. Since the napkin is layered you can also control the translucency of the image by removing the layers similar to the way we removed the back bit of the napkin. You can then save these bits for future use with stamping. For my bird I used all the layers.
Next I started to add the background pieces. These have been torn to be layered into a collage effect. I add them the same way using the glue and the sponge.
I keep layering them until I get the desired look I want. Don't worry about trimming them off just yet. Once they are dry you can trim up the edge of the card to remove the excess. Notice how the colour of the ink and the embossing comes through the stamped images.
Finally I add some of the extra bits of napkin left from when I cut of the bird. this will add a little different type of branch pattern with a hint of color.
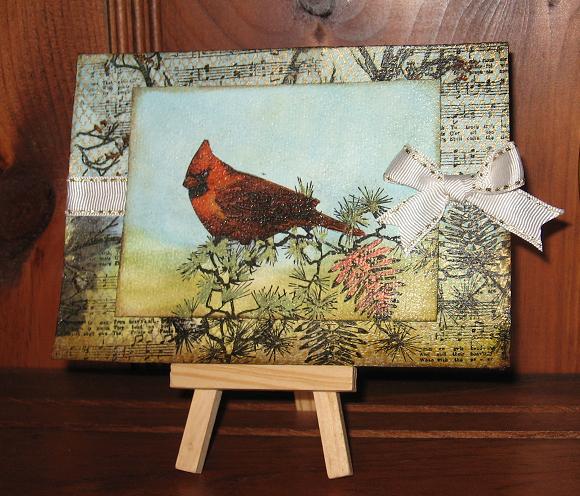
Once I have everything put together I added a little finishing touch with the Metallic paint included in the kit.
And the finished project. See how easy that is. The napkin technique is great for adding titles or sentiments also as you can stamp them on the napkin first getting them just right before adding them to the card or project.
Hope you enjoyed the Tutorial!

Angela

Tuesday 25 October 2011

Its all about fabric

This week the theme at the Try it on Tuesday is all about fabric. This week is an altered Art week once again sponsored by The Craft Barn. So we want to see something altered with Fabric. We also have a special guest Designer TJ joining us so be sure to check out her work and the rest of the Design team at the Try it on Tuesday blog.

For my project I decided to start with a blank frame and some cotton fabric.

then I added some orange Dylusions paint through a Sequin waste. Once dry I added some Dylusions spray inks then used water to create further patterns with the Sequin waste.
Once I dried the fabric with a heat gun, I tore it into strips and added double sided tape to one side.
Finally I adhered the strips down in a whimsy pattern creating layers on the frame.
Finally I finished it off with some spotted tape. I used my new Fall Distress ink set to colour the roses and stamp Tim Holtz Leaves on the ATC background for the frame. The sentiment stamp is from Stampotique.

Ok, its your turn to share your creations over at The Try it on Tuesday blog. Remember one lucky person will win a GC to The Craft Barn.

Now go have some crafty fun!

Thanks for stopping in and have a wonderful day. Angela